

Updated April 20, 2026
TL;DR: Generic onboarding emails fail social media agencies by skipping the technical handoffs that client relationships depend on: platform access, brand assets, and content approval workflows. A 5-email sequence closes that gap by securing Meta, LinkedIn, and TikTok permissions, aligning approval processes, and establishing KPIs before your team writes a single post. Automate the sequence with Instantly's unlimited email accounts and manage every client reply from one Unibox, no per-seat CRM fees, no scattered inboxes.
Most agency operators obsess over creative strategy while their team sits idle waiting for a client to click "add partner" in Meta Business Suite. The social media client onboarding email you send on day one determines whether you launch campaigns in five days or fifteen. That bottleneck is a structural problem, not a communication problem, and a generic welcome email won't fix it.
An in-depth onboarding program can improve client retention by 25%, and 71% of businesses drop or delay a new vendor when their onboarding exceeds one week. The five-email sequence below fixes both risks by treating the first communications as a structured intake process, extracting access, assets, and approval agreements before any campaign work begins.
This guide gives you five copy-paste templates plus a step-by-step automation setup in Instantly.
Why your social media client onboarding email must be specialized
Generic onboarding templates fail agencies because of what we call the "Social Media Specificity Gap." A standard welcome email covers company intros and meeting scheduling but skips the critical step: the client must log in to Meta Business Suite, navigate to Business Settings, and manually enter your Business ID before you can touch a single ad account.
Social media onboarding requires immediate technical access and creative alignment, not just pleasantries. When you skip those two things in your first email, you increase the likelihood of every subsequent delay, revision cycle, and scope dispute.
Prerequisites: Before you send Email 1, confirm you have the client's primary contact name and email, your agency's Business ID for Meta and Business Center ID for TikTok. Most agencies also ensure they have a contract in place and a dedicated sending inbox configured before starting the onboarding sequence.
Social media access setup
You need platform access as the very first task in your onboarding flow. Clients often don't know where to find their Business ID, what permission level to grant, or why the step matters at all. Your first access request email needs to explain the exact steps for each platform and get that in front of the client before they've had a chance to deprioritize the task.
Optimizing content approval flow
Without approval rules set from day one, the content approval process becomes chaotic fast. Clients who receive a content calendar without a clear approval structure will mark it up however they like, send feedback across multiple channels, and create revision cycles that push launch dates back by days or weeks. Setting your approval rules in the second or third email prevents that pattern from starting.
Client social media performance goals
Misaligned KPIs are the fastest way to lose a client who is actually happy with the work. A client measuring success by follower growth will feel disappointed even when your conversion-focused campaigns perform well. Aligning on specific metrics in writing before the first post goes live removes that ambiguity entirely.
Essential elements of social media onboarding emails
Every email in your onboarding sequence needs a clear job. Here are the core components to include across the five-email flow:
- Welcome and team intro: Name the account manager, content strategist, and analytics lead so the client always knows who to contact.
- Goals and KPIs: Document the agreed metrics in writing.
- Asset requests: Request logos, brand guidelines, fonts, and any existing media library.
- Platform access instructions: Link to step-by-step guides for each platform.
- Timeline and milestones: Give the client a specific date for each deliverable.
- Communication plan: Define exactly when and how you will update the client (weekly check-in, monthly report, and so on).
Required social account permissions
You need different permission structures for each platform. Here is what to request:
Platform | Access Type | Permission Level |
|---|---|---|
Meta Business Suite | Ad Account + Page | Manage Ad Accounts, Page Editor or Admin |
Company Page + Campaign Manager | Super Admin or Content Admin, Manager | |
TikTok | Business Center | Operator or Admin |
Required brand assets for social media
According to the Sked Social onboarding checklist, collecting brand assets upfront saves hours of back-and-forth later. Request the following in your welcome email or a linked intake form:
- Logo files (PNG and SVG, all color variants)
- Brand color palette (hex codes)
- Approved fonts and typography guidelines
- Product photography and approved image libraries
- Brand guidelines or style guide PDF
- Any existing marketing collateral or past social content
Setting up your client content calendar
Introduce your scheduling tool or calendar format in the same email where you explain the approval process. Give the client a specific date when they will receive the first draft calendar and tell them exactly how long they have to review it. Vague timelines produce vague responses.
Defining client performance KPIs
Document the agreed KPIs with specific numeric targets, filled in from the kickoff call. The AgencyAnalytics KPI template guide recommends focusing on a select few essential metrics and avoiding KPI overload that can overwhelm clients with data. Documenting specific, agreed targets creates a shared benchmark for measuring progress.
Your onboarding communication plan
Tell the client when they will hear from you, on what channel, and what to expect at each touchpoint. For example: Monday async update via email, monthly strategy call on the last Thursday of the month, real-time alerts for urgent items via a shared Slack channel. Setting this boundary in writing stops mid-campaign ad hoc message requests before they start.
Template 1: Your first client welcome email
Subject: Welcome to [Agency Name], [Client Name] - Your first steps
Hi [Client Name],
Welcome to [Agency Name]. I'm [Your Name], your account manager and primary contact throughout our engagement. [Add team member names and roles as needed for your project]
To kick things off, we need a few things set up this week. Here is what we need from you by [Date]:Platform access (details in our next email arriving [Date])Brand asset pack (logos, colors, fonts - full list attached)Kickoff call booked for [Date/Time]
Our communication plan: [Set your update frequency and reporting schedule]. For urgent items, please use [preferred channel].
Reply to confirm you've received this, and I'll send the platform access instructions right away.
[Your Name]
New client onboarding email subject lines
47% of recipients open emails based on the subject line alone, and subject lines with two to four words yield the highest open rates at 46%. Use these for your onboarding sequence:
- "Welcome to [Agency Name] - Your next steps"
- "Action required: Platform access for [Client Name]"
- "[Client Name], your onboarding timeline"
- "Quick access setup required this week"
- "Your content calendar is ready for review"
- "Your social strategy kickoff"
- "Campaign launch confirmed - here's what's next"
Build your welcome email framework
The welcome email has one job: give the client confidence that you have a process. Open with who owns the account, list the three to five tasks they need to complete in the first week, state your communication plan, and close with a single clear call to action (book the kickoff call or reply to confirm).
Clear client onboarding steps
Use numbered lists for every client task. Paragraphs with multiple embedded requests get missed. A numbered list forces the client to work through each item, which means fewer follow-up emails chasing incomplete tasks. See the ManyRequests onboarding checklist for a complete task structure you can adapt for your agency.

Template 2: Requesting client platform access
Subject: Action required: Platform access for [Client Name]
Hi [Client Name],
To start your campaigns on time, we need partner access to your social media accounts. Please complete the following steps by [Date].
Meta Business SuiteGo to Business Settings > Partners (under the Users tab)Click "Add" and select "Give a partner access to your assets"Enter our Business ID: [Your Business ID]Select your ad account(s) and set permissions to "Manage Ad Accounts"For your Facebook Page, add us as Editor or Admin under Page Settings
LinkedInGo to your Company Page > Admin tools > Manage AdminsClick "Add Admin" and search by name or LinkedIn profile URL for [Your Name/Profile URL]Select Super Admin or Content AdminFor Campaign Manager: Settings > Manage Access > Add User
TikTok Business CenterGo to your Business Center > Partners > Add a PartnerEnter our Business Center ID: [Your ID]Choose Operator or Admin access
Please reply to confirm once complete. If you run into any issues, reply here and we'll set up a short screen share to walk through it together.
Meta ad & page access request
To grant partner access in Meta Business Suite, the client navigates to Business Settings, opens the Partners section under the Users tab, clicks "Give a partner access to your assets," and enters your Business ID. For ad accounts, they then select "Manage Ad Accounts" to grant full campaign management access. For the Facebook Page itself, the correct roles are Editor or Admin under Page Settings. Ripple's Meta access guide includes a visual walkthrough you can share directly with less technical clients.
Required LinkedIn page permissions
For LinkedIn Company Page access, the client clicks "Admin tools" on their page and selects "Manage Admins." They then click "Add Admin" and search by the person's name or LinkedIn profile URL (not email address). Super Admin gives full access including the ability to manage other admins. For paid campaigns, they also need to add your user to Campaign Manager via Settings > Manage Access.
Requesting TikTok & future platform access
For TikTok Business Center, the client goes to Partners, clicks "Add a partner," enters your Business Center ID, and selects Operator or Admin access. The Leadsie TikTok access guide explains how the invitation flow works and what each permission level covers for newer platforms like Pinterest and Snapchat.
Best practices for safe onboarding access
Never ask clients to share passwords. All major platforms provide formal partner or admin access flows that avoid this entirely. Recommend that clients use a dedicated password manager for their own accounts (password managers 1Password and Bitwarden are solid options), and confirm that your agency will only access their accounts through the official Business Manager or equivalent tool. Document the access grant date, permission levels, and access method in your CRM for GDPR or SOC 2 compliance records.
Template 3: Client content approval process email
Subject: Your content approval process: 3 steps to stay on schedule
Hi [Client Name],
Your first content calendar goes out on [Date]. Here's how we recommend structuring the approval process to stay on schedule:
Step 1 - Review: You'll receive the calendar via [tool/link]. We suggest a 2-day review window so you have time to leave comments directly in the document.
Step 2 - Revisions: We incorporate your feedback and return a revised version. Consolidating all feedback in one batch helps us turn revisions around faster.
Step 3 - Final sign-off: Reply "approved" or click the approval button by [Date] so we can schedule posts on time.
If we don't receive approval by [Date], we may need to adjust the posting schedule to keep your campaign on track.
Any questions about this process? Reply here and I'll clarify.
Setting up client content calendars
The first calendar handoff sets the tone for every month that follows. Send it on time, in the exact format you described in the approval email, and include the review deadline in bold at the top of the document.
Streamlined approval steps
The three-step process above works because it limits revision rounds and gives the client a hard deadline. Storychief's approval workflow research confirms that clear terms around revision limits and turnaround times are the primary lever for reducing delays. Training clients to consolidate feedback before sending it prevents piecemeal edits that stretch across multiple days.
Minimizing content revision delays
State your revision policy in the contract and reference it in the approval email. If a client sends multiple separate rounds of feedback, send a brief note explaining that additional revision cycles affect the launch timeline and fall outside the current scope. Referencing the SOW keeps the conversation factual rather than contentious.
Template 4: Automate data collection for reports
Subject: Your reporting dashboard and KPIs
Hi [Client Name],
Here's how we'll track and report performance throughout our engagement:
Agreed KPIs:[KPI 1, e.g., Instagram engagement rate: target [X]%][KPI 2, e.g., LinkedIn click-through rate: target [X]%][KPI 3, e.g., Monthly reach growth: target [X]%]
Reporting schedule:Weekly updates: [Day and time, e.g., every Monday at 9 AM]Monthly reports: [Delivery day, e.g., by the 5th of each month]Dashboard access: [Specify if live dashboard will be provided and include link]
If a metric dips below target, we'll flag it in your next update with a corrective action plan. You won't need to ask what's happening because we'll tell you before you notice.
Please confirm these KPIs and reporting cadence are correct by replying to this email.
Setting up client reporting
Keep the initial KPI list to a select few essential metrics, avoiding KPI overload. Fill in specific targets that you agree on during the kickoff call, because realistic targets vary significantly by industry, audience size, and platform, as AgencyAnalytics notes. Deliver reports on a fixed schedule and never miss one. The Ezibreezy onboarding checklist lists regular reporting as one of the top factors in client retention, and the Vista Social onboarding guide cites poor communication (not poor performance) as the primary reason clients leave agencies.
Monitor campaign health & deliverability
If you run cold email campaigns to support your client's lead generation alongside social, keep your email deliverability and sender reputation healthy across all domains. Mixing client domain health into your regular reporting checks catches issues before they affect campaign output.
Client reporting dashboard setup
Share a live reporting dashboard with the client so they can check metrics between your scheduled updates. This reduces ad hoc update requests and builds trust through transparency. Document the dashboard link in both the onboarding email and your shared project folder so the client can find it without asking.
Template 5: How to automate your social media onboarding sequence
Subject: Your campaigns are live - here's what's next
Hi [Client Name],
Your social campaigns launched on [Date]. Here's an early performance snapshot:
Your live dashboard is here: [Link]
Ongoing schedule: Weekly updates every Monday, monthly report by the 3rd, strategy call on [Date].
Your next check-in is [Date/Time]. I'll send a calendar invite shortly.
Thank you for a smooth onboarding. We're looking forward to building on these early results.
[Your Name]
This onboarding sequence includes five key emails covering welcome, access, approval, reporting, and launch confirmation. The next step is automating it so your team never manually sends or chases any of these emails again.
Validation checklist: Before going live, confirm the following:
- Email automation tool configured with access to the sending account
- Five onboarding email templates drafted and reviewed for accuracy
- Send timing set (Day 1, Day 3, Day 5, Day 7, Day 10)
- Reply handling process in place for access requests and approval confirmations
- Client reporting dashboard created and access permissions verified (agency-managed step, independent of platform setup requirements)
Scheduling onboarding emails
Instantly's sequence builder lets you schedule a five-email onboarding flow with custom intervals between each step. You might configure wait times so Email 1 goes out on a start day you define, Day 1 in this example, then Email 2 on Day 3, Email 3 on Day 5, Email 4 on Day 7, and Email 5 on Day 10, or adjust the spacing to match your onboarding timeline. Assign a dedicated sending inbox for each client's onboarding sequence to keep those emails separate from your outbound prospecting campaigns. Because Instantly gives you unlimited email accounts on a flat fee, setting up a client-specific inbox for onboarding email delivery adds zero per-seat cost.
For additional sequence-building context, watch this walkthrough on getting clients with cold email. The pre-launch campaign checklist in the help center is also worth reviewing before launching any new campaign, including client onboarding sequences.
"I use Instantly for outreach via email, and it has saved me a lot of time by automating my lengthy email sending processes. My favorite part is that the interface is really simple and user-friendly, which makes it easy to handle the many variables in my emails and to create and follow a lot of campaigns." - Levent Y. on G2
Triggered emails for onboarding flow
Set automated follow-ups for each step where the client needs to take an action, specifically the platform access request and the content calendar approval. Configure triggers so Instantly sends a follow-up automatically when clients don't respond. Your team focuses on live conversations instead of chasing tasks. For subject line strategy on follow-ups, the Instantly follow-up subject line guide covers tone and phrasing that re-engages without adding pressure.
The email tracking implementation checklist also maps out a 30-day rollout structure that works well for onboarding new team members to this automated workflow.
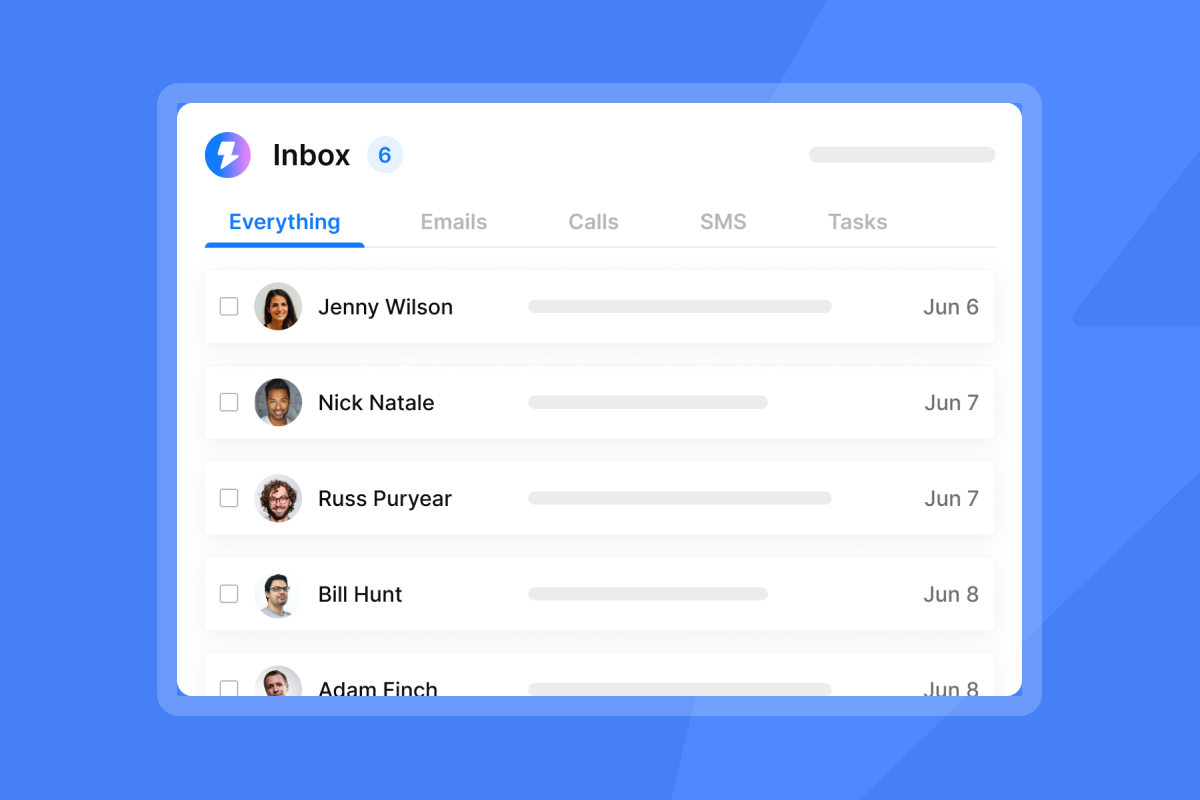
Monitor client onboarding progress
Once the sequence is running, the Unibox centralizes every client reply from every sending account into a single view. You see who responded, who still needs to grant Meta access, and who sent their brand assets, all without switching between inboxes. This becomes especially valuable when you're managing onboarding for 10 or more clients simultaneously.
"The email sequence feature is what I appreciate the most; it saves me a significant amount of time, especially when drafting emails. Moreover, Instantly's AI reply tool is incredibly valuable to me as it helps manage email replies and reduces the need to go back and forth." - Faisal K. on G2
Metric | Manual onboarding | Automated with Instantly |
|---|---|---|
Time per client | Variable, depends on team coordination | Requires initial setup, then streamlined per client |
Consistency | Varies by team member | Highly consistent across all clients |
Reply management | Scattered across inboxes | Unified in Unibox |
Follow-up reliability | Depends on memory | Automatic, rules-based |
Scalability | Breaks down as client count grows | Handles multiple clients in parallel |
Instantly's AI-assisted workflows extend this further into reply handling and task automation as your client base grows.
The flat-fee pricing model makes the math clear. Outreach plus CRM runs $94 per month (Outreach Growth at $47 plus CRM Growth at $47), compared to per-seat CRM tools that charge for every inbox or team member you add. A full starter stack including SuperSearch comes to $141 per month. For an agency managing 20 client inboxes, that difference adds up fast.
Start your free Instantly trial and build your first client onboarding sequence today. Connect a dedicated inbox for each client, load your onboarding templates into the sequence builder, and let the Unibox handle reply management while your team focuses on executing campaigns.
FAQs
How long should a social media client onboarding take?
Complete access grants and asset delivery within the first five days, but expect full client onboarding to span 30 to 90 days based on industry benchmarks. Campaigns should be ready to launch by day 14 once the client completes their tasks, though if onboarding regularly exceeds two weeks, you have a process problem.
What if a client doesn't grant platform access?
Send one automated follow-up at 48 hours, then consider a direct call or additional follow-up if there is still no action by day three or four. If access delays persist, communicate clearly with the client about how the timeline will adjust.
How do I handle onboarding across multiple platforms at once?
Link a single client intake form in your welcome email that covers all platforms and asset requests in one step. Tools like ManyRequests provide intake form templates built specifically for social media agencies.
In what sequence should I send the five onboarding emails?
Email 1 on Day 1, Email 2 on Day 3, Email 3 on Day 5, Email 4 on Day 7, Email 5 on Day 10. Space them 2 to 3 days apart to give the client time to complete each step before the next request arrives.
Read Next
- Cold email subject lines for follow-ups: re-engage without being pushy
- Email tracking myths debunked: what the data really shows
- Do you really need email tracking: diagnostic quiz for sales leaders
Key terms glossary
Digital handshake: The process by which a client grants an agency authorized access to their social media accounts, advertising platforms, or other digital tools. This formal exchange of permissions and credentials enables the agency to begin managing, publishing, or reporting on the client's digital presence.
Unibox: Instantly's centralized inbox feature that consolidates replies from multiple connected sending accounts into a single view, allowing teams to manage all client conversations without switching between separate email clients.
Sender reputation: A deliverability score that internet service providers assign to a sending domain based on email volume, engagement patterns, and bounce rates. A higher score increases the likelihood that emails land in the primary inbox.
Scope creep: The unplanned expansion of a project's requirements beyond its original goals without corresponding increases in time or budget. Clear approval workflows and documented KPIs in your onboarding emails are the primary defense against it.


